
Website Migration to Webflow in 9 easy steps

Before you jump on the Webflow bandwagon for all its preciousness, I have to warn you that website migrations can have a significant impact on your organic traffic. This guide will help you avoid all the mistakes and set you up for success.
Not sure whether you should migrate or not?
I recommend reading: WordPress vs Webflow which one is better?
Setting the right expectations
Migration has the possibility of derailing your site’s performance and traffic, so you need to treat it as a major project and assign the resources (and budget) it deserves. This is a step-by-step walkthrough on Migrating to Webflow. If you precisely follow all the steps you should have a successful migration.
Before you go into a website migration you should know that an initial drop in traffic is to be expected. This is because Google needs time to reindex the changes you’ve made. But this should recover in a few weeks and you will start to see an uptick in activity within the first sixty days.
Case studies of successful migrations:
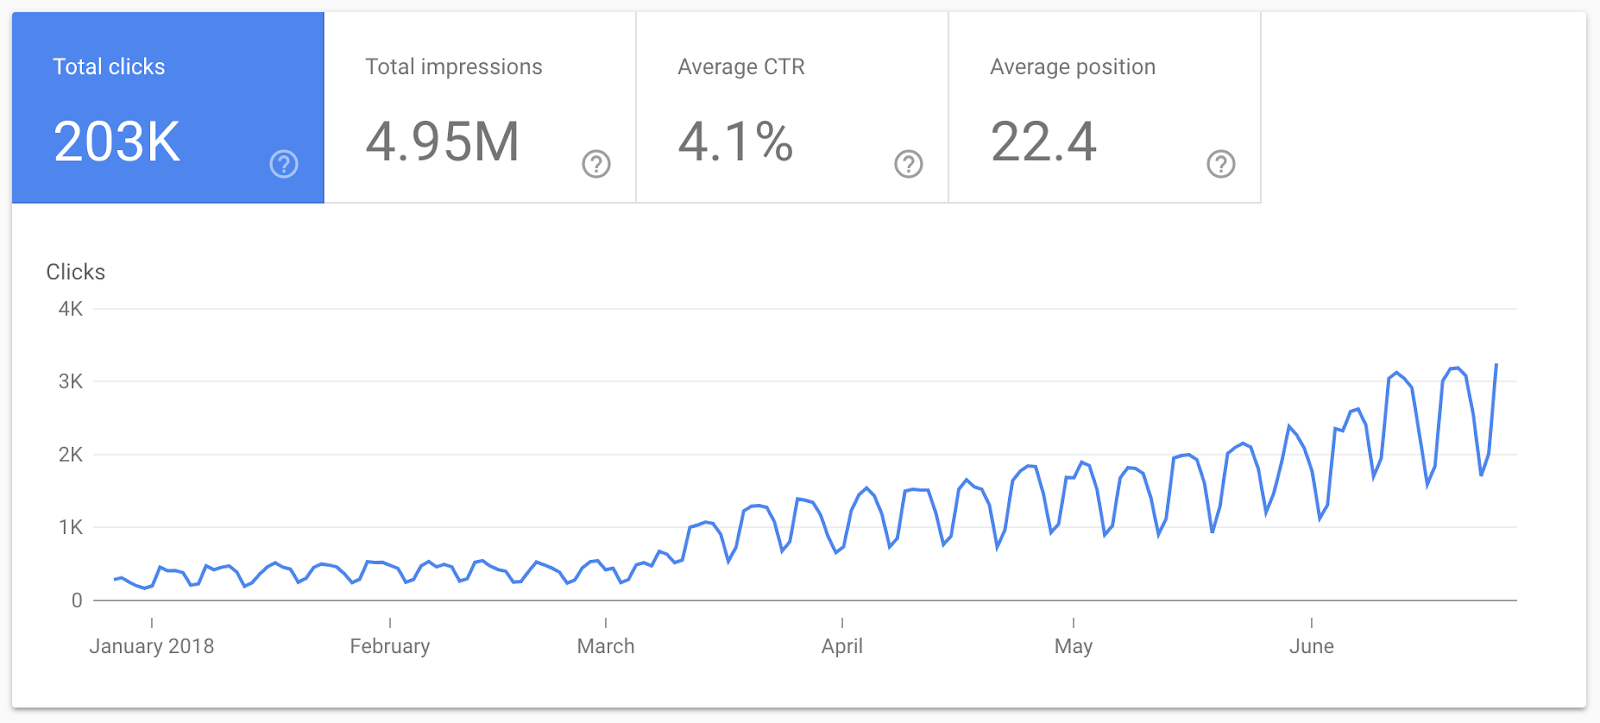
Kisi’s traffic after migrating to Webflow
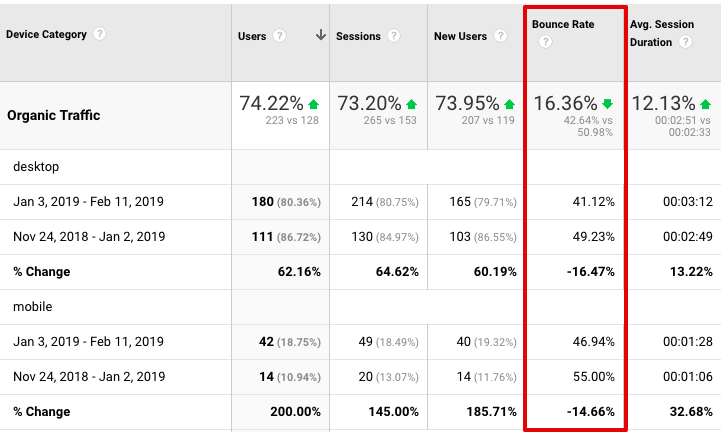
WordPress to Webflow site migration case study + migration checklist
Step 1: Benchmark the Current Website
To have clear insight in how the migration is affecting your performance and traffic you want to start with benchmarking your current website.
- Use Google PageSpeed Insights to get a score on performance, accessibility, and SEO. Take a screenshot to save these scores.
- Check current Google analytics and take note of the current traffic the website is receiving. Note which pages are receiving a good amount of traffic.
- Optional: set up a position tracking tool to monitor the website's current rankings
Step 2: Create a list of Your Current URLs/Pages
A small typo in a URL will break it and you will lose all the traffic conected to that URL. We don't want to miss out on any traffic so it's very important to do this step with precision.
- Use a sitemap extraction tool to pull URLs from the sitemap. Simply put your website URL into the tool and add /sitemap.xml. Here you get a list of all your URLs.
- Use Google Search Console to take note of which pages are indexed.
- Use a backlink analytics tool to take note of all the target URLs. This way we know which URLs the backlinks are pointing to. We want to make sure these URLs stay the same.
- Take note of which URLs/pages you are going to keep, delete or change.
Step 3: Gather Content
Now it's time to gather the content you plan to upload on the new site. If you're coming from a WordPress website, you can use the WP CSV plugin to export content as a CSV file (this only applies to CMS content). Then you can easily upload it to the Webflow CMS.
It’s nice to use Webflow as a staging environment where you can directly store all the content you want to transfer. But to keep things organized I would recommend setting up a Google Drive folder with the following file structure.
- List of pages you are going to keep, delete or change (made in step 2)
- Folder for all the copywriting you want to save thats not included in the CMS
- Folder for assets like images, icons, and video > Create a sub folder per webpage to keep track of the origin of the assets
Step 4: Setting your webflow website up for success
You want to take care of your On-page SEO. This is all the technical stuff that will make it easy for Google to understand the page which affects ranking. Down below is a checklist to help you.
- Do all of your pages have optimized Title Tags?
- Do all of your pages have optimized Meta Descriptions?
- Does every page have an open graph image set up?
- Have you optimized all of your URLs?
- Does each page have one and only one H1? Is it optimized?
- Does each page have at least one internal link coming to it from another page?
- Do your main pages have one external link to an authoritative website?
- Did you compress all your images?
- Did you optimize all the file names of your images?
- Do all your images have optimized alt text?
In terms of optimization this relies a lot on targeting the right keywords. Also don’t forget to check the website manually. Check it on all screens and all browsers to see if there are any bugs.
Step 5: Setup Your 301 Redirects
No matter which CMS you use, there will likely be pages that change and/or go away when you redesign a website. To prevent users from landing on broken pages (and to minimize loss of backlink equity) we set up 301 redirects appropriately. This is handled natively in Webflow, and while there’s no CSV upload option, you can use rules to redirect groups of URLs sharing similar formats.
Be really precise here! Small typos can be catastrophic
If you want to use the migration as an opportunity to remove several old pages from your website. You should know that doing so will reduce traffic. When Google crawls your page the following day and finds that 50% of the indexed pages are gone, it will temporarily penalize your ranking.
The ideal way to remove old pages is to delete a few each week. This won’t scare the Google algorithm, and traffic will remain steady.
Time to set up all the necessary 301 redirects:
Go to the webflow site settings under the “Publishing” tab and scroll down to the 301 Redirects section.
You simply copy and paste the URLs from the list you’ve made in step 2. place the old URLs in “Old path” and put the new URLs in “Redirect to path” and press “Add Redirect Path”. It doesn’t hurt to run a double check to make sure everything is exactly how it should be.

Step 6: Connect your Domain
Go to the webflow site settings under the “Publishing” tab and add your custom domain. If you haven't bought your domain yet I’d recommend Google Domains.
Go to your domain provider and go to the DNS settings to add the DNS records shown by Webflow. If you need more help with this webflow.university explains it the best.
Once connected it’s important to set the “www.” version as default because this will ensure your website has a secure connection (because it contains the SSL-certificate that webflow hosting provides). Without it your visitors will get a “unsecured connection” warning and might leave your website.

Step 7: Setup Google Analytics
Here we set up Google Analytics to track how the migration is affecting your traffic.
I strongly recommend going the Tag Manager route and integrating your Google Analytics with Google Tag Manager. Webflow University provides detailed instructions on how to do this. If you opt to go the Google Analytics route, Webflow has a designated spot to simply plug in your Property ID.
Google Analytics route:
- Go to Google Analytics and select the property you want to use.
- Go to Admin > Data steam > Web stream details > copy the Measurement ID (see picture below).
- Place the Measurement ID in webflow site settings > Integrations > Google Analytics section


Step 8: Set up Google Search Console and upload sitemap
Webflow can automatically generate and update your sitemap. All you have to do is toggle it on in webflow site settings > SEO. Only thing left to do is to submit the sitemap to Google Search Console.
- Toggle auto-generate sitemap in webflow
- Go to Google Search Console and set up your domain.
- Go to sitemaps via the menu on the left and add “your domain + /sitemap.xml”

Step 9: Review the Benchmark
Compare the metrics from your newly migrated site to the old site (see step 1). If you followed all the steps precisely you should see an uptick in traffic within the first 60 days.
Congratulations you successfully completed your migration!
Your Monthly Dose of Branding Brilliance
Monthly insights to keep your brand sharp, your site smarter, and your strategy one step ahead.


Transform Your Online Presence!
Explore insightful articles in which I share my expert insights on Branding, UI/UX Design, and Online Marketing.


.webp)